Minecart tutorial
Minecarts are objects featured in Arid Canyon Zone that can be ridden by the player and follow along a preset network of tracks. Aside from being a method of forcing the player into areas they're not supposed to be in on foot to progress, they as a gimmick can function as a test of the player's reflexes and orientation skills. This tutorial will teach you the basic setup of a minecart track, along with other features that allow for more complex networks.
Instructions
Straight line tracks

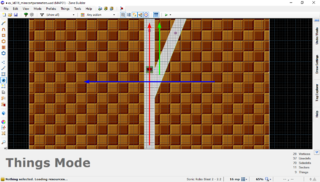
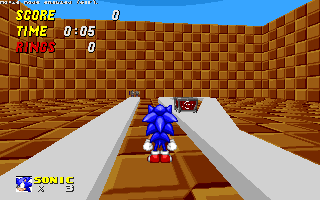
Upon placing a Minecart Spawner Thing on a map, you will notice that it doesn't do anything on its own but kill the player on touch. This is because minecarts will self-destruct when landing on any unauthorized sector, and when minecarts carrying a player self-destruct, the player dies with them.
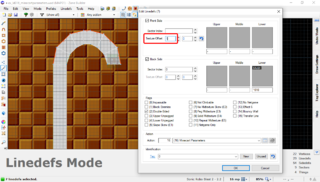
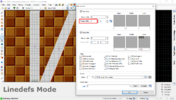
To prevent this from happening, let's build a track for our minecart. Give one of the sides of the track linedef type 16 - Minecart Parameter. By using this effect, we can create sectors that a minecart is allowed to ride on by tagging the control linedef to the desired target sectors, or giving a line that faces those sectors the effect directly.
- Visual steps
-
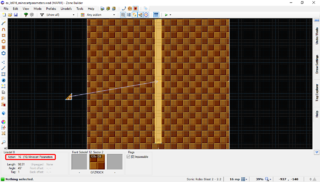
You can apply the Minecart Parameter effect by tagging a control linedef to the desired sectors.
-
It's also possible to directly apply the effect to a linedef facing the desired sector, which we will be doing for convenience.


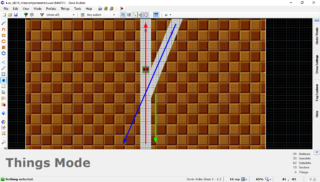
Note that this alone still won't allow the minecart to be ridden, which you can try by touching it again. Minecarts that don't know where to go also self-destruct, and not by coincidence, they orient themselves much like NiGHTS tracks, with the use of Axes and Axis Transfer Lines.
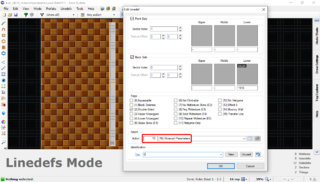
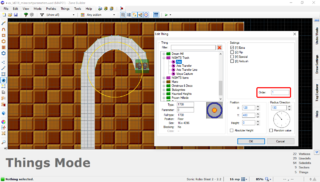
When a minecart lands on a Minecart Parameter sector, it searches for an Axis or Axis Transfer Line with the same Order value that is specified in their respective linedef's front upper texture X offset. Let's try placing an Axis Transfer Line on the track you just made.
- Visual steps
-
An Axis Transfer Line of Order 0 placed on the track. This Order value matches the front upper texture's X offset value of the Minecart Parameter linedef we just assigned.
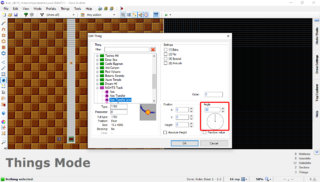
-
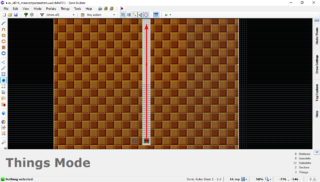
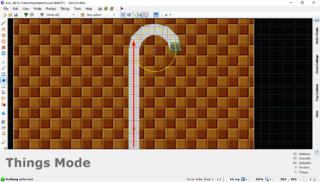
The imaginary line that crosses the Axis Transfer Line in the direction of its angle. It must align perfectly with the track segment.


Since, by default, this Axis Transfer Line's Order value is 0 and the front upper X offset of our control linedef is also 0, they will automatically match as one navigable segment. The Axis Transfer Line can be on any point of the track, provided that its angle is aligned with the track and points to the direction the minecart is supposed to follow: in our case, this would be 90 degrees.
Think of the Axis Transfer Line as an imaginary line that crosses the Thing's position in the angle specified: independently of where the Minecart Spawner is placed or where it points to, if this line doesn't align perfectly with the track, you will notice that the minecart will follow the wrong direction/angle and eventually derail, or spawn outside the track for trying to align with the misplaced Axis Transfer Line.
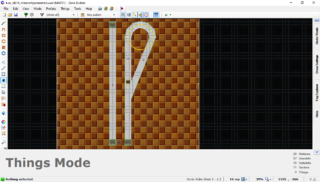
If you try to ride the minecart now, you will see that it takes you to the end of the track nonstop, as expected, but eventually falls off it, killing you. This is where the Minecart Stopper comes in: it is the only way a player can exit a minecart safely, so be sure to always place one of these in the definite end of a track.
- Visual steps
-

A Minecart Stopper placed in the end of our track.
-
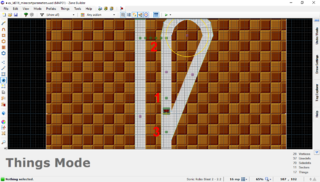
The minecart in action.


Circular tracks
Now you have your first working minecart track, but more complex tracks involve turns and twists. While Axis Transfer Lines are used to make minecarts move in a straight line, Axes allow them to make turns and follow a circular path.
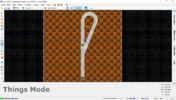
Let's redesign your existing track, but this time to accomodate a U-turn in the very end. Then, place an Axis close to the turn, and adjust its radius value so it not only overlaps with the turn you made, but also makes a tangent with the previous Axis Transfer Line's imaginary line.
Remember to also give this Axis a different Order value: minecarts will automatically align with the Axis or Axis Transfer Line matched to the Minecart Parameter linedef of the sector it's in. This means that all the control linedefs of the sectors that are part of the U-turn must share the same Order value in their corresponding front texture X offsets, as they are all one segment.
- Visual steps
-
A U-turn has been added to the end of our track. Each of the sectors that make this turn must have a Minecart Parameter each, this time with an Order of 1 to signal this is a different segment with a different orientation.
-
An Axis has been placed and its radius value adjusted so it perfectly overlaps with the track. Its Order must also be 1, since this is the path we should follow when the minecart lands on these sectors.
-
The previous Axis Transfer Line's path should make a tangent with the Axis we placed. This ensures the transition between both segments will be seamless.


Remember to move the Stopper you previously placed to the new end of the track so you don't die while testing. You will see that after performing the straight line and moving onto the U-turn, the minecart will turn right around the axis you laid out. Both of these movement patterns work similarly for FOFs, with the control sector being the one receiving the Minecart Parameter linedef effect.
Backwards riding
Aside from these two basic movement patterns, minecarts also possess two notable features that can be observed in the level they debut in. One of them is the ability to ride on previously laid out tracks in the opposite direction, which can prove useful in some designs.
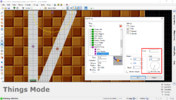
Let's continue working on our previous layout: Draw another straight line segment after the U-turn that connects directly with our first one diagonally. Additionally, move the Minecart Spawner to right after this path intersection so we don't run back into it, and move the Stopper to the beginning of our original segment as well.
- Visual steps
-
A new segment has been added parting from the end of the U-turn and reentering the original lane we built. The Minecart Spawner has been moved to right just after the intersection, and the Stopper is now where the Spawner was.
-
Don't forget to add the Minecart Parameter effect to this segment as well. Since Order 0 and 1 are already used, this one will be of Order 2.
-
The Axis Transfer Line that will control the direction of this segment. Its angle will vary depending on how you drew the sector, but its Order should be 2 as well.
-

The minecart rides our original lane backwards when reentering it from the front.


After giving this section a new Order and a corresponding Axis Transfer Line (the exact angle may vary depending on how you drew it, but it will be the same angle as at least one of the linedefs that make the sides), try riding the track again. You will see that after performing the U-turn and going through the newly drawn path, the minecart will ride backwards through the original lane before hitting the Stopper.
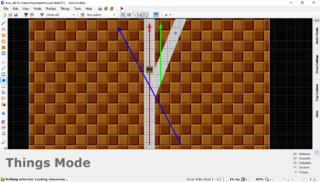
When designing a reentrance in a previously laid out lane, the angles and directions of the crossing Axis Transfer Lines must be taken into account: if the difference between the two Axis Transfer Line angles is any larger than 90 degrees, the minecart will ride the next segment backwards. This will also work for circular paths made with an Axis, although they're more difficult to predict, since the angle the minecart is facing when reentering a lane is what determines the direction it will go.
- Visual steps
-
A minecart coming from a reentrance angle relative to the next lane of less than 90 degrees ("from behind") will ride the next lane in its default direction.
-
Coming from a straight angle onto the next lane will also make the minecart ride it in its default direction.
-
In our case, the reentrance angle is much larger, meaning the minecart is coming "from the front". It will thus ride the next lane backwards.


Switching lanes
Finally, minecarts can jump from a lane to another with Minecart Switch Points. When a minecart touches a Switch Point, depending on its angle, it will toggle what we will be calling "switching mode", which is the ability to jump between nearby tracks. Once switching mode is active, arrows will be appearing over all accessible Axes and Axis Transfer Lines in the field of view of the player, allowing them to safely jump to any of the laid tracks.
Switching mode is activated by colliding with a Switch Point from the front, meaning it has to be facing the direction the player is expected to come from. Colliding with a Switch Point from the back turns switching mode off, meaning that, in occasion that the player has to go through a track backwards, there is no danger of switching mode being on or off when it shouldn't.
Checking the Ambush flag on a switch point will invert these conditions: colliding with one from the front will disable switching mode, while colliding with it from behind will enable it.
Let's build a parallel track to our first one, and lay out a few Switch Points like indicated in the pictures below.
- Visual steps
-
There is now a track parallel to the first one we built. Aside from its own Axis Transfer Line of Order 3, there are Minecart Stoppers on both ends.
-
Switch Point #1, facing towards (270°) the minecart, will activate switching mode, while the barrage of Switch Points #2 facing away (90°) from the player will turn it off. Switch Point #3 is also facing away (90°) from the player, but has the Ambush flag.
-
Switch Points in action.


When the player hits the Switch Point #1 from the front, switching mode will be enabled, allowing hopping back and forth between the first and second tracks. However, in our original track, just before we hit the U-turn, the set of Switch Points #2, facing away from the player, will turn it back off until we ride back into the original lane, where Switch Point #3 with the Ambush flag facing the intersection will enable it again to allow switching one last time.
Note that there will be circumstances where you will need switching mode enabled or disabled at all costs, so by all means it's valid to place many Switch Points side by side like a wall to make sure the player collides with them when they're entering or leaving a certain area.
| Note In Zone Builder, Axis Transfer Lines of consecutive Order values will show a yellow line connecting them. This is a NiGHTS track editing feature and has no effect on minecart track layouts. |
Samples
Sample 1
- This contains all of the tracks made with this tutorial, along with their auxiliary Things.
- Example file: ex_ld016_minecartparameter.wad (MAP01)
| How to use |
|---|
|