Zone Builder tutorial/Additional tips and tricks
If you have reached this chapter, you know everything that is important for mapping. At this point, you should have the necessary knowledge to understand how specific linedef and sector specials work when you read their corresponding articles. With that, you are able to make any map you want. However, there are a few tricks that are not necessarily required or important, but can be a great help when mapping. These are explained here.
Visual Mode

Visual Mode is an extremely powerful asset to Zone Builder that allows you to preview the whole level without actually starting SRB2 and modify it while browsing around. This allows you to easily find errors and check if a certain section looks like you had imagined it. Visual Mode requires DirectX to be installed (it is automatically installed by Zone Builder's installation wizard if necessary). If there are unsaved changes in the map when starting Visual Mode, the nodebuilder is run first, which might take some time in larger levels. If the nodebuilder is taking overly long, go to Tools → Preferences and change to the Editing tab. In the Options section, you can enable "Use blockmap instead of nodes in Visual Mode". This will stop the nodes from being built when entering Visual Mode, but it may cause some sections of the map to be displayed inaccurately.
To start Visual Mode, press the "Visual Mode" button in the editing modes bar to the left or the W key. By default, you will start out at the current mouse position. You can place a 3D Mode Start (Thing type 3328) however, which will always stay in the last place it was scrolled to. In Visual Mode, you can move around with the ESDF keys (essentially the WASD setup shifted one key to the right) and exit with the W key. Surfaces and Things can be highlighted in Visual Mode by simply facing towards them and selected by left-clicking on them. Right-clicking on them opens their properties window. Missing textures will appear yellow with exclamation points while unknown textures will appear as white with question marks, which makes them very easy to spot and fill in.
The following are some controls and shortcuts that are useful in Visual Mode:
- You can raise the floor or ceiling of a highlighted sector by scrolling the mouse wheel.
- You can change textures and flats directly by holding the Ctrl button and right-clicking on them, which will bring up a selection menu.
- You can copy textures and flats by highlighting them and pressing Ctrl+C. You can paste copied textures and flats onto a highlighted surface by pressing the middle mouse button (or the mouse wheel for mouses with wheels).
- You can copy the properties of sectors and linedefs by highlighting them and pressing Ctrl+Shift+C. You can paste them onto highlighted sectors or linedefs by pressing Ctrl+Shift+V.
- Things are displayed by default, but this can be toggled by pressing T.
- Brightness levels of sectors are displayed by default, but this can be toggled by pressing B (this also works outside of Visual Mode). This is useful in levels with very dark sections.
Texture alignment
When you have comparatively short linedefs in a level, you are bound to run into the problem of misaligned textures. You can easily notice this when making staircases (like the one we made in Chapter 4), especially if you choose textures with large shapes like GFZROCK: The squares do not line up properly, which creates a rather ugly effect. While you can align these textures by changing their offsets manually, that is very tedious. Instead, you can use Visual Mode's auto-alignment tool. In Visual Mode, face the general area you want to align and then press A. In most cases, this will align the textures correctly but it will not remove all misalignments all the time. If any of the alignments are still incorrect, you can align the textures manually by facing them with the camera and pressing the arrow keys to shift the textures around. Note that flats cannot be aligned normally, but you can use linedef type 7 in case you find it necessary.
- Visual Steps
-
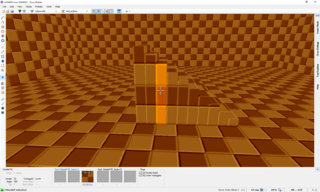 The misaligned textures of a staircase in Visual Mode.
 -
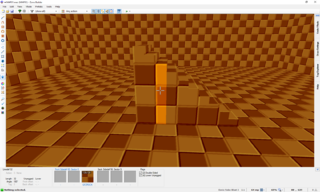 The textures after pressing A to automatically align them.


Joining and merging sectors
There are times when you will find that several distinct sectors can or should actually have the exact same properties. Properties in this case include heights, flats, sector effects and tags. In these cases, it is often desirable to join or merge these sectors, both to make them easier to edit and to improve the framerate by lowering the number of sectors. This can be very useful if you have, for example, many different sectors that are all virtually identical and should have the same tag, for example for an FOF. In this case, joining them together will make it easy to select them all at once in case you need to change anything. To do this, just select all sectors you want to join and then select Sectors → Join Sectors in the menu bar. They will then all become part of the sector you first selected, even if they are spread across the map.
There is a slight difference between joining and merging. Joining simply groups the sector into one. Merging, on the other hand, removes any linedefs that are part of more than one of these sectors. If you join two sectors that are connected by a linedef, the linedef will remain. If you merge them, it will disappear. Depending on what you want to do, either option can desirable. If the linedef is used for anything, such as an effect or a middle texture, you should retain it. If you don't use it in any way, you can safely merge the sectors and delete it.
To separate previously joined sectors again, switch to Make Sectors Mode and click on the area that should become a separate sector again. As long as it is surrounded fully by linedefs (which it should be if it was joined with a different sector), it will be highlighted in yellow. If you click on it, it is separated from the rest of the joined sector and becomes a new sector. If you want to separate two merged sectors however, this will not work since the border that separated them was removed. In this case, simply re-draw the border and then left-click. The two sectors will then be reformed along the newly drawn border.
- Visual Steps
-
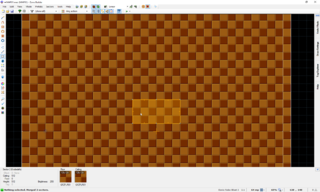
 Two joined sectors, with the shared border still intact.
 -
 Two merged sectors, with the shared border absorbed.
 -
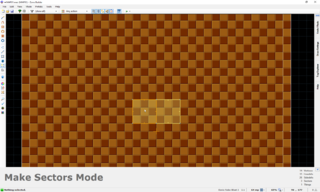 Separating two joined sectors in Make Sectors Mode.


Prefabs
Pre-fabrications, or prefabs for short, are a method of copying and pasting whole sections of a level from one map to another. This is very useful if you want to merge two different files into one map, or if you have created complex scenery items that you want to re-use in another map. Prefabs are very simple to use. Simply select whatever you want to copy and then go to the Prefabs menu. There, select Create From Selection... and save it as a file somewhere on your hard drive. To insert it somewhere, select Insert Prefab from File and it will be pasted into the map. Since it is automatically selected, you can also easily move, resize or rotate the selection before putting it where you want it.
Arithmetic operations in numerical fields

Sometimes you may find that you need to change the properties of several map components by the same relative amount – but not necessarily to the same absolute value. For example, if you want to raise an entire staircase by a certain height, you can't simply adjust the height of all sectors at once because they are at different heights. However, Zone Builder allows you to change values by a relative amount by typing the amount into the field, preceded by "++" for a relative increase or "--" for a relative decrease. For example, if you select all sectors of a staircase and type "++64" into the floor height field, the staircase will be raised uniformly by 64 fracunits. You can do this with all sector, linedef or Thing properties that uses numbers, including tags.
Similarly, the prefixes "+++" and "---" allow you to incrementally change values of different sectors, linedefs or Things in the order in which they were selected. For example, if you select all sectors of a staircase in ascending order and type "+++64" into the floor height field, the first selected sector will remain unchanged, the second sector's floor will be raised by 64 fracunits, the third sector's floor will be raised by 128 fracunits, the fourth sector's floor with be raised by 192 fracunits, and so forth. In total, this will increase the step height of the staircase by 64 fracunits.
Finally, the prefixes "*" and "/" are also supported. These multiply or divide the values of all chosen sectors, linedefs or Things by a given value.