Zone Builder tutorial/Thing placement
Now that you have learned everything about sectors and linedefs, we will take a look at Things. Things are invaluable for making maps, since rings, enemies, monitors, scenery objects and much more are all Things. Placing them is actually very easy, and much less complicated than what you learned in the previous chapters.
To place a Thing, simply go into Things Mode and right-click anywhere on the map. Because the last Thing you placed was a Player 1 Start, another Player 1 Start will appear. The properties window for the Thing will automatically open. Here you can select the type of Thing you want to place, as well as edit its properties. The window is divided into three sections:
Thing

This section allows you to select the Thing type and displays some basic properties of the selected Thing type. All Thing types are listed here, divided into categories. Click on a Thing type in the list or enter its number into the Type field to select it.
- Type: The Thing type number of the currently selected Thing. Each Thing type has its own number by which it can be identified. For example, the Player 1 Start you have selected at the moment has the Thing type 1. You can type the desired Thing type number into the box to quick-select a Thing type. With a bit of experience, you will quickly remember the numbers for the most important Thing types, such as 300 for a ring or 100 for a blue Crawla.
- Parameter: This is a special value between 0 and 15 that is used by some Thing types to determine extra properties. For most Thing types it's irrelevant. For the Thing types where it is relevant, the name of the field is changed to indicate what it does. For a more detailed explanation of what the Parameter value does for a specific Thing type, refer to the article for that Thing type.
- Full type: This is a combination of the Thing type and the Parameter value. It is used by the game internally but is usually unimportant when editing the map.
- Size: Width and height of the Thing's collision box in fracunits.
- Position: Indicates whether the Thing spawns on the ceiling by default, like a Chain, or spawns on/over the floor, like most other Thing types.
- Blocking: Indicates whether the Thing is solid ("True-Height"), like a Gargoyle, or intangible ("No"), like a Bush.
- Class: This is irrelevant for SRB2.
Settings
Similarly to linedef flags, there are several flags for each Thing that can modify their behavior or appearance. This section displays them as a list of checkboxes that you can check to give the Thing specific flags. The Flags value box below this list displays the sum of the mathematical values of the chosen flags, combined with Z offsets – you should normally leave this alone unless you know what you're doing. Some Thing types use the flags value for a different purpose; in this case the box is renamed to indicate what it does. As with linedef flags, the names of the Thing flags are always adapted to indicate what they do for the current Thing type. For a more detailed explanation of what they do for a specific Thing type, refer to the article for that Thing type. Below is an explanation of what they do generally:
- [1] Extra: This flag is generally unused.
- [2] Flip: This flag inverts the Thing's gravity direction. For instance, power-up monitors will be flipped upside-down and laid on the ceiling instead of the floor, while Things that hang from the ceiling by default (e.g. chains) will be flipped upside-down but laid on the floor instead of the ceiling.
- [4] Special: This flag has no general effect but is rather used by certain Thing types for specific effects.
- [8] Ambush: This flag has no general effect but is rather used by certain Thing types for specific effects. For example, for rings it is called the Float flag because it makes them hover 24 fracunits above the ground. In the image above, you can see that it is called Spawn on ceiling. This is because for player starts, it causes the player to spawn on the ceiling rather than the floor.
Position and Angle
- X/Y: These values indicate the position of the Thing on the map. You can change them manually here, but in most cases it's more practical to move them directly in the map view.
- Height: By default, Things are placed directly on the floor (unless the Thing hangs from the ceiling by default or the Flip flag is checked). Here you can set how far up from the floor the Thing should be located in fracunits (or if it spawns on the ceiling for the aforementioned reasons, how far down from the ceiling it is located). If you check the Absolute Height checkbox, the absolute height is used instead, i.e. the distance from height 0 – the program will automatically calculate the correct relative height value for you, which you can see if you uncheck the box again.The maximum possible relative height for a Thing is 4095.
- Angle: This normally controls the direction the Thing is facing. It is measured relative to the east in a counterclockwise fashion, so 0º is east, 90º is north, 180º is west, and 270º is south. Since the sprites for Things only have eight rotations, it only makes sense to use the Angle in steps of 45º for most Things. You can use the "Random value" checkbox to choose a random angle between 0° and 359°. Some Things (e.g. the Star Post) use the Angle for other effects; in these cases it can have any value and might even exceed 360º. As with other fields, this field is renamed for Thing types that use it for special purposes to indicate what it does.
Placing Things
As an example of a Thing, place a ring. Either select it in the "Rings and Weapon Panels" group or type 300 into the "Type" box. You will now see that the name of the Ambush flag has changed to Float. Check this flag to make the ring float 24 fracunits above the ground, like all rings should normally do. Now click OK and right-click somewhere else on the map. As you can see, you placed another ring, and it also has the Float flag checked. Whenever you place a Thing, it will be an exact duplicate of the last Thing you placed with all its properties. Remember to uncheck the Float/Ambush flag when placing a Thing of another type. To place Things on top of other Things, simply create them next to each other and then drag one on top of the other while right-clicking.
Z offsets become necessary whenever you want to place a Thing on top of an FOF. For example, if you want to have a floating platform with a spring on it, but simply place the spring in the target sector, it will attach to the floor below the FOF. To put Things on FOFs, do not put them into the control sector, but adjust their height so that they sit on top of the FOF. For example, if you have an FOF whose ceiling is at 96 fracunits and you want to place a yellow spring on top of it, you must give it a height of 96. If you want to place an upside-down spring on the bottom of the FOF, give the spring the Flip flag. Since flipped Things spawn on the ceiling, you must now subtract the bottom height of the FOF from the ceiling height of the sector.
- Visual Steps
-
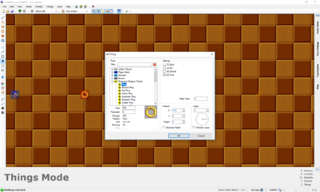
Placing a ring and giving it the Float flag.
-
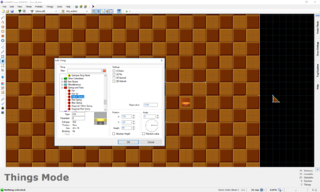
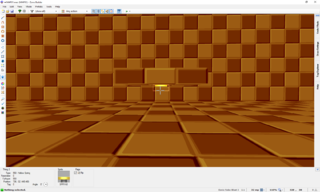
Placing a spring on top of an FOF with top height 96.
-
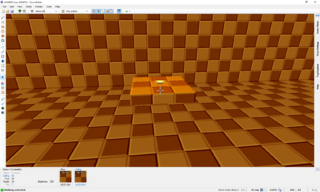
The spring on top of the FOF in Visual Mode.
-
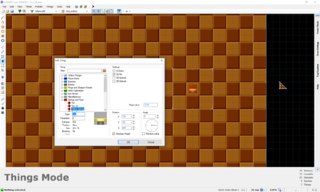
Placing an upside-down spring attached to the bottom of the FOF by giving it the Flip flag and subtracting the bottom height of the FOF (64) from the ceiling height (512).
-
The spring attached to the bottom of the FOF in Visual Mode.


