Zone Builder tutorial/Creating level boundaries
In this chapter, you will learn how to create a small testing stage that can be played in SRB2. While doing this, you will also be introduced to some basic terms and rules of level editing, learn about the attributes of sectors and linedefs, and learn how to create a thok barrier.
Sectors
The first thing you need to do is create the boundaries of your level by drawing a large sector. This sector defines the edges of your level, and everything beyond it will be unused space. To do this, go into Linedefs Mode and right-click anywhere on the grid. A label will appear where you clicked that reads "L:0, A:0". If you move your mouse away from it, you will see a yellow dot where you first clicked, another yellow dot at your current mouse position, and a line coonecting the two dots. The dots are vertices and the line is a linedef. The label moves along with the linedef and always stays in its center. It indicates the current length ("L:") and angle ("A:") of the linedef. The length is measured in fracunits, the basic unit of distance in SRB2. As a point of reference, Sonic can jump about 100 fracunits high. This measurement will seem a little strange at first, but you will quickly get a feeling for it. The angle is measured counterclockwise from the east, so 0° indicates that the linedef is facing east, 90° indicates north, 180° indicates west, and 270° indicates south. As explained in the previous chapter, the angle of the linedef is indicated by the notch, which always points to the right of the linedef. So if the notch is pointing south, for example, the linedef is facing east and its angle is 0°.
If you left-click now, the vertex next to the mouse will stay in the place where you clicked and the linedef will stop moving. You have now permanently created the linedef. A new vertex and linedef will appear so you can place another linedef connected to the first one. This will continue indefinitely until you place a vertex on top of the very first vertex. Then the linedefs loop and you have thus created a sector.
- Visual Steps
-
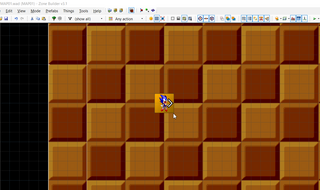
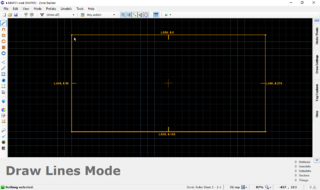 Drawing linedefs to create a sector.

Sector properties

Now go into Sectors Mode and right-click on that sector. It doesn't matter for now if your sector looks weird; we will delete it and create proper sector later on. A window will appear that shows the properties of the sector:
- Ceiling height/Floor height: Here you can specify the ceiling and floor height of the sector, also measured in fracunits. They can also have negative values, but the ceiling must always be above the floor. The program automatically calculates the total sector height from these two values and displays it as the "Sector height" field below.
- Height offset: You can use this field to shift both the floor and ceiling height up or down by a certain amount at the same time. For example, if you enter 8 and then close the window, the floor and ceiling will both be 8 fracunits higher than before.
- Brightness: Here you can choose how bright the sector is. 255 is full brightness while 0 is pitch black. In most cases, the brightness shouldn't be below 128, because that is already very dark.
- Flats: Here you can specify the flats, which are the graphics that the floor and ceiling will display. If you haven't modified these boxes already, the label for the ceiling should read
F_SKY1and the label for the floor should readGFZFLR01. The box above that label should show the checkered brown graphic that is used in Greenflower Zone. You can click on the box to open a window with a selection of available flats. At the top is a list of all flats that are currently used in the level; below that is a list of all available flats. The labels in the top left corners of the flat indicate their size. - Special: Here you can give the sector a special effect, either by selecting one from the drop-down box or typing in the effect number if you already know it. Sector effects include death pits, sectors that end the level, team bases for CTF, and many more. We will take a closer look at sector effects later on.
- Tag: This is very important for later on, so don't change it. We will come back to this in a later chapter.
Invalid sector configurations


Before we create a proper sector, you should know what constitutes a valid sector and what doesn't. Invalid sectors will produce graphical glitches and may even crash the game, so you must always make sure all sectors in your map are valid. There are two limits to the shape a sector may have: Firstly, two linedefs may never cross each other. Instead, if you want two lines in your level to cross, you should always place a vertex at the crossing point. This vertex splits the linedefs in half so that none of them touch each other directly. Zone Builder will automatically try to prevent linedefs from crossing by inserting a vertex at the crossing point.
Secondly, sectors must always be closed. That means that they must always consist of a full loop of linedefs and may not have any openings. While unclosed sectors are theoretically possible to make, they can lead to unexpected behavior and glitches. You can check if a sector is closed or not by hovering your mouse over it in Sectors Mode. The linedefs that belong to the sector will be highlighted with yellow. Make sure they form a full loop.
Thok barrier
Now we will create a proper sector that we can use as a test stage. A simple square that is fairly large will do. Delete your old sector by selecting it (left-click in Sectors Mode) and then pressing the delete key on your keyboard. Now go back into Linedefs Mode and draw a square sector that is about 2048×2048 fracunits wide. This will be our test stage. Go into Sectors Mode and right-click on the sector. You will see that the floor height is 0 and the ceiling height is 128. This is a bit too low for our purposes, so change the ceiling height to 512.
Since we now have a sector, you might think that the stage is now ready to test. However, if you click on the Test Map button in the toolbar, you will see that SRB2 will start up but immediately crash with the error message "Level has no nodes". This happens because SRB2 requires every level to have at least two sectors. To add another sector to the level so we can test it, we will create something called a thok barrier. In previous versions of SRB2, due to the way the game was programmed, players could sometimes walk through the outer walls of a level and thereby leave the level boundaries. This was fixed by creating a sector that surrounded the entire level, which was called a thok barrier. This sector acted as a solid wall that blocks players.
Thok barriers are no longer necessary, but they are still useful for controlling how high the outer walls of outdoor rooms that show the sky are. To create a thok barrier in your test map, draw another sector around the first map. Although the shape of the thok barrier doesn't matter, it's practical to make it closely follow the outline of the level, so in our case you should also make it square. Always leave a bit of space between the thok barrier and the inner sector, for example 32 fracunits.
The floor and ceiling height of the thok barrier must be identical to each other, so that its total sector height will be 0. They should be somewhere between the floor and ceiling height of the inner sector. So in our case, the floor and ceiling height of the thok barrier must be at least 0 and at most 512. The height itself determines how high the outer walls that surround the level will be. Let's use a value of 128. Now the outer wall will be 128 fracunits high, which is higher than Sonic can jump, but low enough to see the edge of the boundary. In indoor rooms, a thok barrier isn't necessary, but if you do use one, it should stretch all the way up to the ceiling.
| Note You can also create a new sector inside the first one instead of creating one around it. In both cases, the outer sector is the thok barrier, while the inner sector is the actual level. However, this tutorial assumes you created the thok barrier around the first sector. If you did it the other way around, some of the properties and values mentioned later on might be different, so follow the tutorial if you're not experienced in level making yet. |
- Visual Steps
-
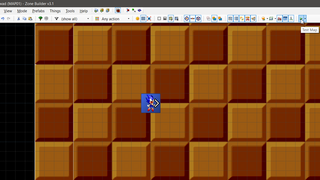
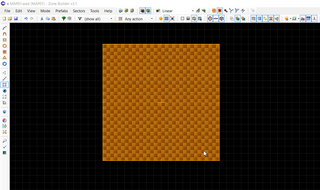 Creating the first sector.
 -
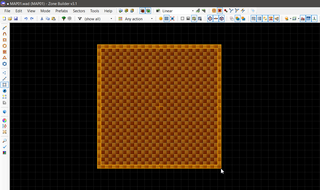 The thok barrier, with floor and ceiling height set to 128.


Linedefs
You now have a thok barrier, but your stage is still not ready to test. Go into Linedefs Mode and hover over one of the inner linedefs with your mouse. You will see six boxes on the panel at the bottom of the window, divided into a "Front Sidedef" and a "Back Sidedef" category. You should see a yellow warning graphic in the first and third box of the "Front Sidedef" category, which indicates that textures are missing. Textures are for linedefs what flats are for sectors. They are the graphics displayed on the walls of the level. As you might remember from the opening paragraph, each linedef has two sidedefs. Those two sidedefs are the "Front Sidedef" and the "Back Sidedef" shown in the panel, respectively.
Since the linedefs of your inner sector don't have textures where they should, the game won't know which graphics to display for the outer walls of the level and will exhibit a visual glitch called the hall of mirrors effect if you load the map. To prevent this, we will now give these linedefs textures. To select all four linedefs, left-click on them one by one and then right-click on one of them. You can also select the whole sector in Sectors Mode and then go back into Linedefs Mode. Then all linedefs belonging to that sector will be automatically selected. After right-clicking on one of those linedefs, a window will pop up:

Sidedefs
In the upper half of the window are two boxes, one for the front sidedef and one for the back sidedef. Since not every linedef has a back sidedef, the back sidedef checkbox might be unchecked in some cases. For both sides, the settings are the same.
- Sector Index: This specifies which sector this side belongs to. In our case, it should be 0 for the front side and 1 for the back side, since our front sides are part of the inner sector and the back sides of the same linedefs are part of the thok barrier. Theoretically, this value doesn't need to match the sector that a sidedef is physically part of, i.e. the sector that it actually faces. For example, you could put "7" here and then the sidedef would be part of sector 7 even if that sector is somewhere else in the level. Of course, you should never do this because it will lead to severe rendering issues. However, there are some situations where the value you see here might actually be wrong and you need to change it manually. For example, this can happen after copy-pasting sectors incorrectly.
- Texture Offset: This controls the offsets of the textures on this side. You will often need to give a texture offsets to align it with the textures of the surrounding linedefs. The first box is for horizontal offset; a positive value will push the texture to the right, a negative value will push it to the left. The second box is for vertical offset; a positive value will push the texture upwards, a negative value will push it downwards.
- Upper/Middle/Lower: Here you can set the textures for the sidedef, similarly to how you set the flats for sectors as explained above. The boxes are, from left to right, for the upper, middle and lower texture. What these are will be explained in the next chapter.
Other properties
- Flags: This is a list of checkboxes. Each of these checkboxes represents a flag. With the use of flags, you can change the behavior of linedefs. Most of these flags are only useful for the previously mentioned special effects, but some do something on their own. The Not Climbable flag will prevent Knuckles from being able to climb the linedef's walls, hence the name. The Block Enemies flag will prevent enemies from attacking the player as long as this linedef is between them. The Impassable flag will prevent most objects (including the player) from crossing the linedef. The Bouncy Wall flag causes the player to bounce off the linedef's walls when touching them. The other effects will be explained later on.
- Action: Linedefs can be used for several special effects in the level. Those special effects are selected here. We will come back to this later.
- Tag: You might recognize this from the sector properties window. As before, don't change it, since it will be important later on.
In our case, the warnings indicate that the upper and lower front texture are missing. However, since the ceiling of our sector shows the sky, we don't need an upper texture. Double-click on the box for the lower front texture and you will see the same window as the one for the flats, only for textures. GFZROCK should be listed as the only used texture, so choose that as the texture. Your map is now ready to be tested. The only thing that needs to be done beforehand is placing a spawn point for the player. To do this, go into Things Mode and simply right-click somewhere inside the inner sector. Since the spawn point, called Player 1 Start, is automatically the first Thing to be placed, you can now test your map. Close the window that pops up (we will look at it later) and click on the Test Map button in the toolbar.
- Visual Steps
-
 Selecting the linedefs of the inner sector.
 -
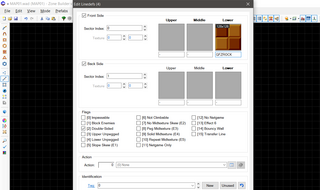 Setting the lower front texture to
GFZROCK. -
 Placing a Player 1 Start.
 -
 Testing the map.


