Zone Builder tutorial/Advanced mapping tools
In this chapter, you will learn about some of the more advanced techniques of sector and linedef editing. For example, you will learn how to resize and rotate parts of your level, add new linedefs to a sector, and make round shapes and stairs. All of these things can be done manually, but Zone Builder has specific tools that help you do them easily and quickly.
Drawing modes
In addition to the classic editing modes we've used so far, Zone Builder also offers specialized modes for drawing level geometry. These modes are listed at the top of the editing modes bar on the left side of the screen. When selecting a drawing mode, further options for the mode appear next to the menu bar, or in the case of Draw Grid Mode, as a panel in the sidebar to the right. The following modes are available:
- Draw Lines Mode: We already used this mode in Chapter 3. Left-click to start drawing a line, drag the mouse around to adjust, and left-click again to place the line and start drawing the next one.
- Draw Curves Mode: The basic controls of this mode are identical to Draw Lines Mode. You must first draw a linedef that is used as the basis for the curve. Then, when you draw the second line, you will notice that both linedefs are automatically split and rearranged to create a curve that goes through the ending points of the initial linedef and your current mouse position. You can continue drawing curves like this indefinitely until you right-click or draw a closed loop. In each step, the previously drawn line is modified to match up with the direction of the line you are currently drawing. You can specify the average length of the individual curve segments that are drawn in a field next to the menu bar. The shorter you make the length, the more linedefs are used to create the curve. This makes it more accurate, but also more time-consuming to render. Avoid using too many linedefs or the level may become laggy.
- Draw Rectangle Mode: This mode allows you to draw a entire rectangle in one step. Left-click on the screen and then drag the mouse around to adjust the size of the rectangle. Click again to add it to the map. The options next to the menu bar allow you to round off the edges of the rectangle.
- Draw Ellipse Mode: This mode allows you to draw an ellipse or a circle. Left-click on the screen and then drag the mouse around to adjust the size of the ellipse. Click again to add it to the map. In the menu bar at the top of the screen, two option fields will appear: One allows you specify the number of linedefs in the ellipse, while the other allows you add spikes of variable length that extend outward or inward from the ellipse. As with the curving tool, using more linedefs will make the ellipse more accurate, but also more time-consuming to render. Avoid using too many linedefs or the level may become laggy.
- Draw Grid Mode: This mode allows you to draw a rectangular grid. Left-click on the screen and then drag the mouse around to adjust the size of the ellipse. Click again to add it to the map. The options panel in the sidebar to the right allows you to set the number and distribution of the divisions in the grid.
- Insert Things Radially Mode: This mode allows you to draw a group of Things in a circular arrangement. This is particularly useful to place items in NiGHTS maps. The options next to the menu bar allow you to set the size of the circle, the number of Things and the Thing type to be placed.
Splitting linedefs
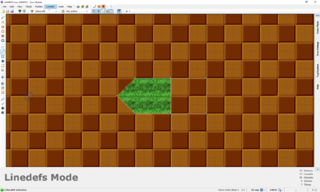
Sometimes you want to change the shape of a sector after you've made it. In that case, you might need more linedefs for the sector. For example, try to change the square sector with the raised ground into a pentagon. To do this, you need a fifth linedef. In this case, you can split one of the linedefs by placing another vertex somewhere on top of it in Vertices Mode. Then, you can drag the vertex around to change the shape of the sector.
However, this method doesn't work if the linedef you want to split is diagonal to the grid lines, because there might be no third point where it lines up with the grid. This might be the case with one of the linedefs attached to the vertex you just dragged around. If you want split such a linedef, you can either move it around so that it does line up with the grid, or you can disable the Snap To Grid option in the toolbar at the top. A third method, which also allows you to split multiple linedefs at once, is to go into Linedefs Mode and select Linedefs → Split Linedefs in the menu bar, which automatically inserts a new vertex in the middle, regardless of the linedef's position on the grid.
- Visual Steps
-
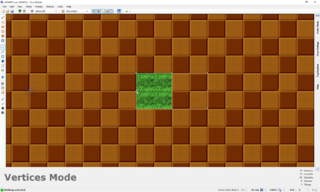
Inserting a vertex into a linedef in Vertices Modes to split it.
-
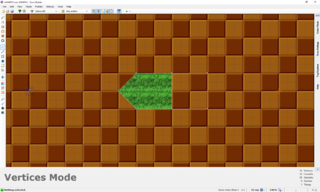
The resulting sector after moving the inserted vertex.
-
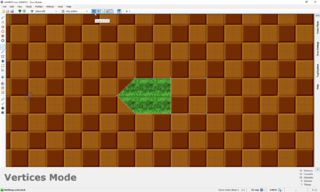
The Snap to Grid option.
-
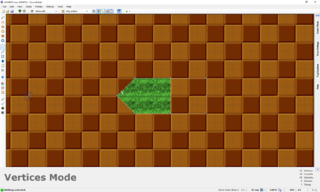
Inserting a vertex into a linedef independent of the grid.
-
A linedef split in half with the Split Linedefs tool.


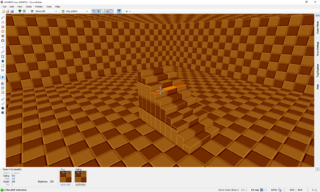
Creating stairs
Staircases in SRB2 are essentially just many sectors placed next to each other, with each sector being slightly higher than the previous one. This would be very tedious and repetitive to create manually, but Zone Builder offers Stair Sector Builder Mode, which allows you to automate the process.
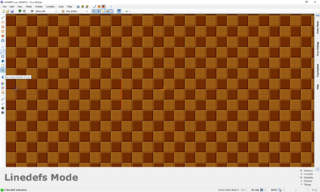
To create a staircase, first draw a single linedef that serves as the start of your staircase. Its length will be the width of the staircase (192 fracunits is a good size, for example). The staircase will extend in the direction that the linedef's front side is facing (although you can also choose to have it extend in the direction of the back side later). Now select the linedef and select Stair Sector Builder Mode in the editing modes bar to the left. A window will pop up that allows to set the properties of the staircase. A preview of the staircase will be shown on the map, highlighted in red.
First you should the number of sectors that the staircase should consist of at the top left of the window. Below that, you can choose the sector depth, i.e. the length of the individual steps. If you want to, you can also add spacing between each step. The height differences between the steps are set in the floor height/ceiling height fields to the right. In our case, we want to create a staircase on the floor, so only the floor height box is relevant. "Base" sets the height at the bottom of the staircase, e.g. the floor below the first step, while "Modify" sets the height difference between each step. Below these two fields, the heights of the first and last step are shown. At the bottom of the window, you can specify flats and textures for the staircase. In our case, since we are creating a staircase on the floor, you should specify a lower texture.
We want to create a staircase with ten steps, where each step is 32 fracunits long and the height difference between each step is 24 fracunits (this is the maximum step height for a working staircase that the player can walk across, unless you use a Ramp Sector effect). To do this, set the number of sectors to 10, the sector depth to 32 and the "Modify" value for the floor to 24. Since the surrounding sector has a floor height of 0, the "Base" value should be 0. Set GFZROCK as the lower texture. Now click OK to generate the staircase. If you test it in-game, it should rise from height 0 to height 240 in ten steps, and there should be no missing textures on the sides.
- Visual Steps
-
The initial linedef that will serve as the base of the staircase.
-
Stair Sector Builder Mode.
-
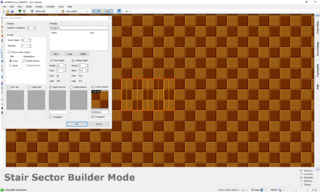
The Stair Sector Builder window, where you can set the parameters of the staircase. The outline of the resulting staircase is displayed in the map.
-
The resulting staircase in Visual Mode.


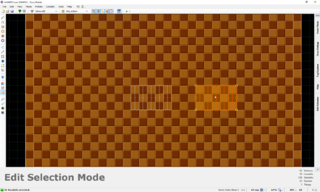
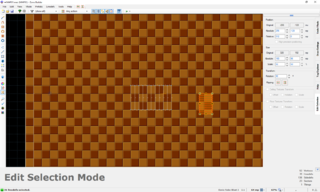
Edit Selection Mode
Edit Selection Mode allows you to move, resize, rotate and flip arbitrary selections. This is very useful when you have complex structures that you want to use multiple times in different locations. Before you enter Edit Selection Mode, you must first select the map components you want to edit. Your selection will stay active when you switch to another mode, so you can for example select Things in Things Mode and then switch to Linedefs Mode and add linedefs to the selection. After you have made your selection, enter Edit Selection Mode by either pressing E or clicking the button on the editing modes bar to the left. If you copy and paste a selection, you will automatically Edit Selection Mode so you can edit the pasted selection.
In Edit Selection Mode, your selection is highlighted with a transparent rectangle. Grab the selection with your mouse and drag it around to move it. Additionally, there are handles in the corners and on the edges of this rectangle. You can resize the selection by grabbing one of the handles on the edges with your mouse and dragging it. If you move your mouse outside of the selection rectangle, a ruler will appear that allows you to align the selection with other level geometry. You can rotate the selection by grabbing one of the handles in the corners with your mouse and dragging it. Normally, the selection will only rotate to the nearest 45°. Press Shift while rotating to rotate the selection freely. You can flip the selection horizontally or vertically with the two buttons to the right of the menu bar.
If you want more precise control over your actions, you can open the Edit Selection panel by moving the mouse over the sidebar on the right side of the screen. In this panel you can precisely specify the position, size and rotation of your selection. The position and size can be set both absolutely and relative to the original position and size. The panel also has buttons for flipping the selection like the ones next to the menu bar.
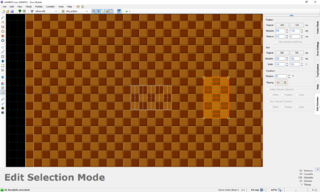
For this tutorial, we will rotate and resize the staircase you made in the last step. You should retain the original staircase, so select all sectors that belong to it, copy them and paste them onto an empty part of your level. Since you copied and pasted the selection, you're already in Edit Selection Mode, so move the mouse to the sidebar on the right to open the Edit Selection panel. There, in the rotation field, enter a rotation of 90° and press enter to see the results. Now we will resize the staircase with the options in the "Size" category. You can select the horizontal and vertical size separately, either in fracunits or as a percentage of the old size. Negative values additionally flip the selection. Choose 50% for both dimensions and press enter. Your staircase is now half as wide and half as long as before.
You should use caution with these tools if the selections you want to modify are connected to other sectors. Since the vertices will be moved when using these tools, the adjacent linedefs will be modified as well, which can result in crossing linedefs. Therefore, you should normally only use these tools for isolated constructions like the staircase you used above or for whole levels.
- Visual Steps
-
Creating a second copy of the staircase.
-
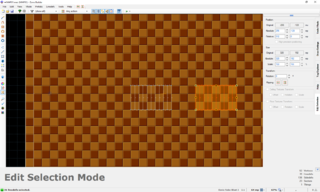
Opening the Edit Selection panel.
-
Rotating the staircase by 90°.
-
Resizing the staircase to 50%, horizontally and vertically.


Flipping linedefs
Sometimes you might want to flip a linedef so that its front side becomes its back side and vice versa. For example, this is useful if you want to apply a texture to several linedefs at once, but the texture would be on the front side for some linedefs and on the back side for others. In this case, you will want to flip some of the linedefs so that the texture is on the same side for all of them. To do this, select the linedefs you want to flip and select Linedefs → Flip Linedefs in the menu bar. This will exchange the sidedefs and automatically update the sector references so that the geometry stays valid. As a result, the notch will flip to the other side, indicating that the linedef has been flipped.
| Note There is also a "Flip Sidedefs" option, but this will only exchange the properties of the sidedefs without flipping the linedef itself. This will cause the sector references to become invalid, so you will have to correct them manually afterwards. |