Model

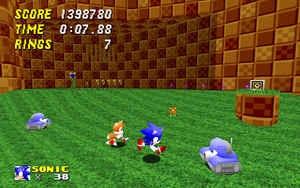
3D models can replace sprites in OpenGL. In SRB2, to use a model, three things are needed: the model itself, a skin for the model (in the PNG format), and a file named models.dat that determines which sprites are replaced with what models. Apart from the file extension, the names for the model file and the skin file must be identical. Both files must be placed inside a folder named models in SRB2's main directory, or inside a subfolder within the models folder. It is important both files must be located in the same place.
To use 3D models, the console variable gr_models must be set to on. The console variable gr_modelinterpolation allows for smooth transitions between frames.
Adding custom models to SRB2
SRB2 itself already comes with 3D models for the vanilla characters and several objects. But many users have created custom models, either as alternatives or for custom characters. Contrary to what you might assume, custom models are not addons and cannot be installed the same way. To install them, follow these steps.

1. Download the models pack you want. Remember, only trust downloads from the SRB2 Message Board!
2. Inside the pack folder, there should be subfolders containing texture and model files. Move these subfolders into the "models" subfolder of where you installed SRB2. Do not move the pack folder itself, just the subfolders.
3. The models pack folder should also contain a models.dat file. Move this into your main SRB2 folder, and not the models subfolder. It will ask you if you want to replace the one already there, select yes. If the pack did not come with a models.dat file, or you don't want to overwrite the vanilla game's models.dat, you can copy the lines pertaining to each model into the vanilla one using a text editor. See the models.dat section below for more information.
4. Open SRB2, and go to the Video Options menu. If you haven't already, set the renderer to OpenGL (the default is Software).
5. Scroll down to the OpenGL Options menu, and enable 3D models.
If you have done everything correctly, your custom models should now be working. If not, make sure everything is exactly correct, the slightest mistake will prevent your models from working. You don't need to load anything from the addons menu for just models. However, custom models are simply cosmetic and do not add additional characters on their own; to use models for a custom character, you will also need to load the addon for that custom character.
models.dat
models.dat is a user-created configuration file that assigns the models to sprites. It must be placed in the main SRB2 directory. Only one such file is needed, regardless of how many models are loaded. For each model, one line of code must be added to the file.
A typical line of code in models.dat looks like this:
SONIC SONC.MD3 3.0 0.0
The line contains four parameters:
- The first parameter is the name of the sprite set or skin that the model replaces – in the example above the skin
Sonicis being replaced. When replacing a sprite set, the four-character sprite prefix must be entered here, e.g.THOKwhen replacingSPR_THOK. Note thatSPR_PLAY, the base sprite set for all player sprites, cannot be replaced with a model – the sprites for each individual character skin used by the player have to be replaced instead. When replacing a skin, the skin name set in name for theS_SKINmust be used here. If the skin to be replaced has the same name as an existing sprite prefix, the line should be prefixed with "PLAYER", for example:PLAYERTHOK THOKCHAR.md3.
- The second parameter,
SONC.MD3, is the file name of the model, or the file location of the model inside the models folder. Normally models are expected to be directly within the models folder, but they can also be within subfolders of this folder. In this case, the file name written in models.dat should besubfolder/SONC.MD3, subfolder being the name of the subfolder in the models folder. Note that this parameter is also used to locate the skin file for the model, swapping the file extension with ".png" or ".pcx" – it is expected that the skin file is in the same folder as the model itself.
- The third parameter,
3.0, is the overall size of the model displayed in-game.
- The fourth parameter,
0.0, is the offset of the model on the north/south axis. This does not affect the actual position of the object the model represents. Most models display correctly at 0.0, but some need an offset to display in the right place.
Authors usually provide the correct parameters and all that needs to be done to use them is to enter the parameters into models.dat.
Animation
- Models used in SRB2 require vertex animations to work.
- For character skin replacement models, you simply need to name your animations accordingly in your model file to match the animations they're for, with the prefix "
SPR2_"or "SUPER". For example, Sonic's walking animation is dubbed "WALK" so his model's walking animation need to be named "SPR2_WALK" while his super form's would be "SUPERWALK". - Additionally, you can dictate whether or not an animation interpolates in the Sometimes interpolation mode by adding a "
+i" to the animation name. So Sonic's walk would be named "SPR2_WALK+i". - For any models that do not replace characters, they simply use the animations present in the model, in the order they are presented. You can still name and divide them if you wish, and add "
+i" to their name for interpolation.
Color changing
3D models that replace sprites for objects that have the ability to change color can be made to change color by including an additional blending texture. This texture should have the same name as the normal texture, but should end with _blend.png. For example, a model called SONC.md3 should have a base texture called SONC.png and a blending texture of SONC_blend.png. This texture should be a grayscale texture; lighter areas of the texture are closer to white, while darker areas of the texture are closer to black. Any transparency in the texture makes the model use the colors from the base texture instead of the blending texture. If the object does not have a skin color currently set, the model will use the base texture only and no blending will be performed.
External links
- Misfit Model 3D – One of the most used 3D modeling tools in the SRB2 community.
- Maverick Model 3D – A more up to date version of Misfit Model 3D and has better MD3 support.
- SRB2 Message Board – The section of the SRB2 Message Board where custom models can be found.
