User:toaster/The (Formerly) Unwritten Rules Of Level Design
I've always wanted to write a document on the things I've learnt about Sonic Robo Blast 2 whilst developing it, and given that release isn't imminent and I don't feel like working on anything else right now this might as well be the time I do it. I've spent a lot more time with the in-development 2.2 than earlier versions, so some of this information may not be applicable to the current version of the game, and it'll frequently become rambling (I never said this was a beginner's resource, after all...), but I hope you'll find this an interesting look behind the scenes all the same.
On Power-ups
On shields
In 2.1, there are two categories of shield: The five SRB2 shields, and the one basic shield (also known as the Pity shield in ringslinger modes). The next major version will also add the three Sonic 3 & Knuckles shields, which I will subsequently refer to as the S3K shields. Each of them is a well-rounded assortment in and of itself, catering to different niches over a varying set size. Don't deviate from a particular set without thinking about why they've been selected that way. If you're mixing and matching, ask yourself what is added to the experience by doing so. If there isn't a good reason, you probably shouldn't.
For example, consider the recent title, Sonic Mania. It combines the second and third set - the S3K shields plus a bonus, inferior shield. This is an exercise in attempting to stuff as many power-ups into one game as possible. The ultimate celebration of past and future, maybe, but enjoyable this is not - frequently, simple exploration combined with an errant jump ends up trading your powerful, specialised shield for a generic, pitiful one. This is less of a problem in the third dimension, but even so you're left with a number of powerups that are considered next to useless (or perhaps even harmful) to take advantage of, taking away value from your stage.
Of course, that doesn't mean to say that experimentation with shields is wrong, or that you should shy away from it entirely; you just have to be careful with it. For example, you could attempt to double down on a specific theme - a mechanical level with only the Thunder and Magnet shields to provide variety whilst never losing the ability to walk on electrical surfaces without damage, or a mountaintop storm with only the Whirlwind and Thunder shields to ensure the double jump is never lost. This requires you to have a coherent theme in mind, though.
In addition, this can all go out the window the moment you start to introduce custom shields. The Cactus Shield of SUBARASHII's Roasted Ravine is an example of an interesting extension to the standard shield set, but there's nothing about it that particularily conflicts with the S3K assortment either. If you're competent enough to be implementing your own powerups, then this should be treated more as advice than as a rock-solid set of rules.
On progression
There are lots of ways you can require the usage of a monitor in order to proceed down a path in your stage. There's the oft-ignored Gravity Boots monitor which enables a player to walk on the ceiling for a short amount of time. If you want to run across lava, the Elemental and Flame shields both work, but so does Invincibility. If you want someone to navigate an underwater labyrinth with no spawning air supply, the Bubble and Elemental shields are the best tool to use.
However, with this decision comes a responsibility. If this is on a main path, and not just a bonus/secret one, and it's not possible to turn back, these monitors should almost certainly be Golden Monitors - constantly respawning item boxes that will always, repeatedly give you the prize inside. (If you are attempting to recreate this with version 2.1 or earlier, something behaving similar to this should be reasonably feasible to SOC - no Lua required!)
This is necessary because of multiplayer - SRB2 can be very fun when playing online, and intentionally messing with those that do just because you only thought of singleplayer progression can be very frustrating. It also has the secondary benefit of allowing someone who failed the task to try again without needing to throw themselves into death's open maw. It's a great way to reduce friction between the player and the level and allow them to have more fun with it if their skill level isn't quite there yet.
On general advice
Remember: Just because something exists doesn't mean you have to use it. A level needs not be a grab-bag of random features the engine offers, but is often at its best when being more selective. For example, if you want to use every single shield in one stage, then you should be seriously asking yourself why. Even if you're restricting yourself to one of the described sets at most, what's going on? The Greenflower Zone 1 of version 2.2 does include one of every single standard SRB2 shield, but there's a clear motivation - it provides a bit of a visual exploration of how these work in action, without being involved in an explicit tutorial. Are you designing the first level newbies to the game will ever experience? Or do you just want to mix everything together?
On liquids
On common types
The following table provides a recommended style guide mapping between liquid colours and their behaviour. If you wish to use one of the mechanics described in your level, you are strongly encouraged to match the colour provided in the list. Likewise, if you wish to implement a new liquid behaviour, its visual presentation should not closely resemble any of the ones listed below.
| Liquid colour | Usage |
|---|---|
| Water (blues, cyans, greys, translucent) | By far the most common type of liquid, and with the most acceptible variation in visuals - perhaps because it's unambiguously safe. I had quite some difficulty pinning down a single colour representation for it in this table, for example. Any overly transparent liquid will look like water, if necessary to have non-blue liquid for aesthetic reasons.
In maps based off standard SRB2, there should generally only be three negative consequences for falling in something that looks like water - sluggish movement, a pressing need to locate air, and the potential loss of an electrical or fire-based shield. If, for example, you put water immediately over the top of a death pit (like is standard for 3D Sonic games), you aren't thinking fully of the ways you can play with it. Imagine how fun those levels would be if you could run across the sea bed! |
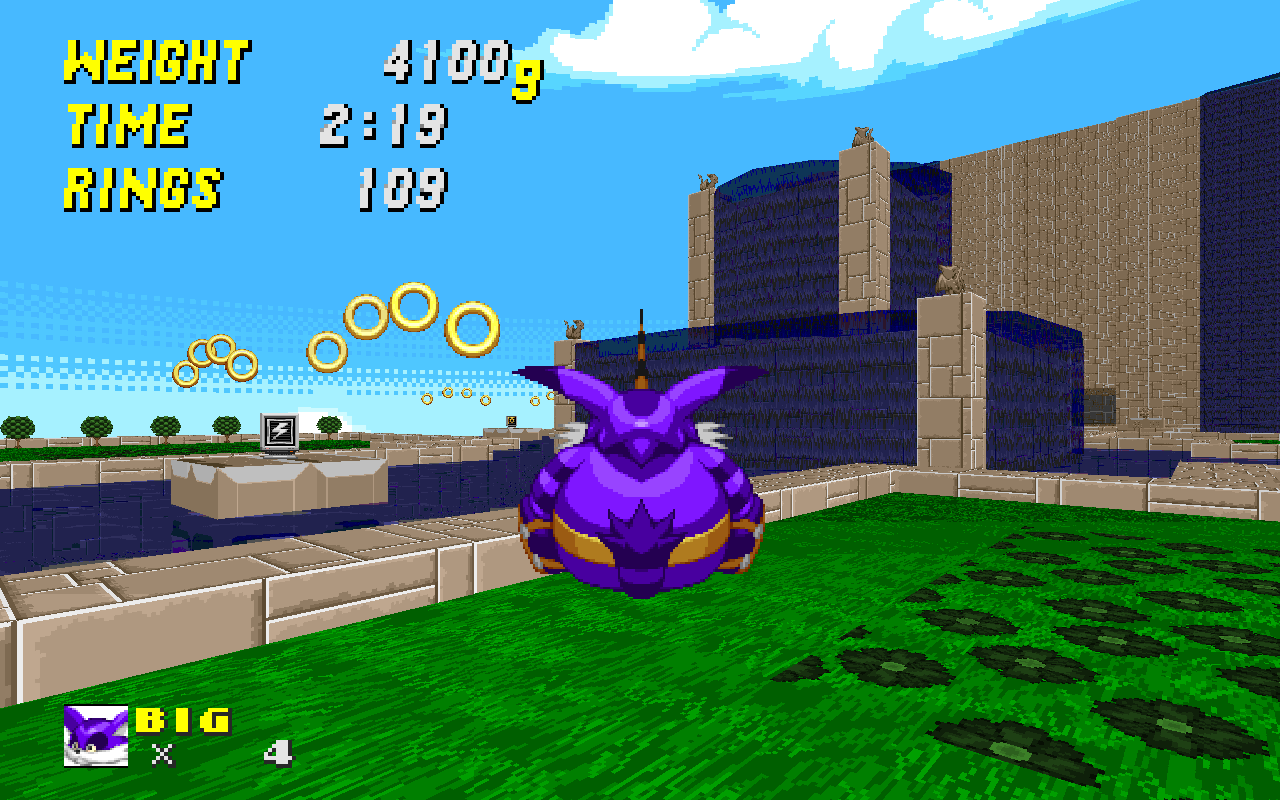
| Buoyant goop (lavender, purple) | This liquid was introduced in 2.1, causing the player to rise whilst submerged. Other than that, standard water rules apply; electrical or fire-based shields are lost, and being forcefully kept under the surface by colliding with a ceiling can lead to drowning. There's lots of space to explore by combining with ceiling-mounted hazards, but this liquid just hasn't been used very much in the first place.
In previous versions, acid was typically this colour. Since Techno Hill Zone's primary gimmick was changed to this in 2.1 (effectively stealing the liquid colour), the hazard is recorded in this table as its most common alternate colour to avoid conflict or confusion in future stages. |
| Lava (orange, red, yellow) | To players, the top surface is solid, and the entire FOF is damaging to those without fire-based shields. The gameplay purpose of this is to seperate a player from their rings forcefully, preventing their easy re-collection.
In previous versions it behaved identically to acid, except with the same rules on fire-based shield protection instead of water-based. |
| Acid (green) | A corrosive form of water not currently used in the main SRB2 campaign. Upon entry, causes damage to any player not currently wearing a water-protecting shield. It is easily the single most punishing mechanic that has ever existed in this game - not only does the sluggish motion of water cause problems for attempting to escape, but the standard thirty seconds of underwater time before death is combined with the rolling three-seconds-and-change between each subsequent damage. The end result is that the player can constantly struggle to - and barely continue to - survive, but still end up dying. It's possible to use this in a fun way in an intentionally difficult level, but uncritical usage of this mechanic is discouraged.
In version 2.0 of Egg Rock Zone, green acid was used as an instant kill mechanic. I will go into more detail on this later, but it is extremely important that mechanics are kept consistent; since death pits already behave like the most important aspect of this, using a liquid as an instant kill mechanic is considered an extremely bad design decision and should be avoided at any cost. |
| Quicksand/mud (gold, brown) | Technically not treated as a liquid by the game, but functionally identical to one. Pressing jump will cause the player to rise slightly; mashing the button will allow for their continued presence above the surface. This is perhaps the one instance where it is considered reasonable to place a death pit underneath a liquid, given that any player paying attention can survive, but there also exists the possibility to allow a player to fall through the bottom into a secret chamber filled with goodies.
In one room of versions 2.0 and 2.1 of Arid Canyon Zone 1, black oil was used as an alternative liquid representation for this gameplay gimmick. Whilst retexturing a mechanic for the purpose of matching the theme of a zone is not a cardinal sin, the zone technically could have already supported a more standard expression of the gimmick due to its arid, dusty nature, and oil was already being used as a low-friction solid surface; therefore, repeating this design decision is discouraged. |
On general advice
Remember: Just because something exists doesn't mean you have to use it. A level needs not be a grab-bag of random features the engine offers, but is often at its best when being more selective. For example, if you want to use multiple liquids in one stage, then you should be seriously asking yourself why. Even if you're trying to design a Chemical Plant style stage, you've got to come at it with a coherent theme - how do these liquids interplay? Are they overly similar in behaviour? How would a room that contains multiple of these play?
I once tested a map that featured both the standard, everyday water, and a custom liquid with the space countdown property assigned to it. What was frustrating about this was that they were both effectively the same - the space countdown liquid gave ten seconds of survival time, whilst the normal water gave thirty. There was no effective, compelling reason for both to coexist. Meanwhile, CoatRack's Chemical Facility Zone 1 and 2 combine a whole grab bag of interesting, unique liquids (and solid, translucent jellies) that do strange things to player physics. If you want to justify your chemical plant containing a bevy of distinct chemicals, it needs to be evident in the way their gameplay interacts.
Woops! Turns out this page isn't finished. Maybe come back some other time?