Zone Builder tutorial/Getting started
Before you start making your first map, you need to install and set up Zone Builder and get familiar with its interface.
Installation
Windows
Download the installer from here and run it. It will automatically install all necessary dependencies.
macOS
It is possible to run Zone Builder on Intel-based Macs using CrossOver Wine (a version of Wine modified to support 64-bit versions of macOS). If you have an ARM-based Mac, you are, sadly, out of luck (for now).
Start by downloading the latest Zone Builder setup executable. Then setup Wine:
- Download the latest version of Wineskin (on the GitHub release page, it is the download labeled "Unofficial.Wineskin.Winery.zip". Extract it and launch "Unofficial Wineskin Winery.app".
- Install the latest engine and select it (at the time of this writing, the latest engine is
WS11WineCS19.0.1-1) - Update the wrapper version (if available)
- Select "Create New Blank Wrapper" and name it "Zone Builder". Wait for setup to complete.
- Install the latest engine and select it (at the time of this writing, the latest engine is
- "Zone Builder.app" will be created in "$HOME/Applications/WineSkin/". Right click "Zone Builder.app" and select "Show Package Contents." Open "Wineskin.app".
- Install the necessary Winetricks packages
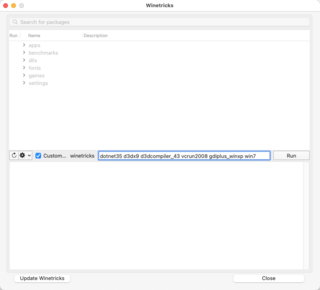
Preparing to install the Winetricks packages. - In the Wineskin window, select "Advanced". Then select the "Tools" tab. Click on "Winetricks".
- Press the "Update Winetricks" button. Press "Yes" when it asks you to confirm.
- Install the following packages in order:
dotnet35 d3dx9 d3dcompiler_43 vcrun2008 gdiplus_winxp win7- You can simply check "Custom..." and copy-paste the above list of packages into the "(arguments)" text box. Then press "Run".
- Wait for the process to complete. This can take several minutes.
- Wait for the packages to install.
- Close the Winetricks window.
- Install Zone Builder.
- In the Wineskin window, select "Install Software".
- Select "Choose Setup Executable" and select the Zone Builder setup executable you downloaded earlier.
- Follow the installer (just click "Next" and use the defaults)
- Once the install is finished, it will prompt you to choose Zone Builder's executable. Select "C:/Program Files/Zone Builder/Builder.exe"
- Close Zone Builder
- Install the Winetricks
winxppackage.

Zone Builder should be installed. You can launch it by clicking "Test Run" in the Wineskin window or by simply opening "Zone Builder.app".
Now you will probably want to configure Zone Builder for Sonic Robo Blast 2:
- Launch Zone Builder
- In the Windows menubar, select Tools->Game Configurations...
- In the sidebar, select "Sonic Robo Blast 2 - 2.2"
- Add the game resources.
- In the "Resources" tab, click "Add resource..."
- Select the "From PK3/PK7" tab.
- Click the folder icon. Navigate to and select "/path/to/Sonic Robo Blast 2.app/Contents/Resources/srb2.pk3".
- Press Open/OK to get back to the "Game Configurations" window.
- Set up the testing engine.
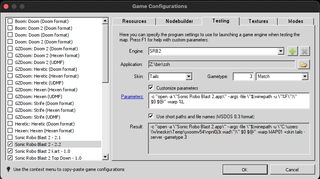
Testing engine settings for macOS. - Select the "Testing" tab
- Rename the Engine to something reasonable, e.g. "Sonic Robo Blast 2"
- In the "Application" field, press the folder icon and navigate to "Z:\bin". In the file name box type "zsh". Press "Open"
- Check the "Customize parameters" box.
- Replace the parameters with:
-c "open -a \"Sonic Robo Blast 2.app\" --args -file \"$(winepath -u \"%F\")\" $0 $@" -warp %L - Press OK

Zone Builder should now be set up for mapping on (Intel-based) macOS!
Linux
Zone Builder does not have native binaries available for operating systems other than Windows, but it is possible to run it using Wine. Download the latest stable binary for your OS here and install it. Note that the Wine package provided with many distributions, such as Ubuntu and it's derivatives, WILL NOT WORK. You MUST use the one provided by WineHQ's repository. Otherwise Zone Builder will install but will crash on launch. Zone Builder has been confirmed to work on Wine versions 3.19-Staging, 4.0, and 6.0, it should work fine in any release following those. Only the 32-bit installation is necessary.
| Note For Those Using Wine 7.0+, The Latest Base .NET Packages that Wine comes with now, mainly being Wine Mono, provides enough support that actually allows you to use Zone Builder without going through the loops provided below. However, if you want a more stable experience, you may still want to follow some, if not all of the steps listed below. For those using any alternatives or source ports of Wine, such as Bottles or Lutris, you'll also have to go through the steps below as well. |
Unlike on Windows, the dependencies Zone Builder automatically installs are not necessarily sufficient to run itself in Wine. To get around this, you must install these dependencies yourself using using Wine's library installer script, Winetricks. Find the Wine executable you just installed and run it. It should open a command line window showing some basic commands used to operate Wine. Execute the following command to install Zone Builder's dependencies using Winetricks: winetricks -q dotnet35 d3dx9 d3dcompiler_43 vcrun2008 gdiplus_winxp riched20 corefonts win7. Winetricks should begin downloading and installing several versions of Microsoft's .NET packages, then DirectX 9, Visual C++ 2008, Window XP's Graphical Programming Interface, Extra Libraries and Modules to help Smoothen the Zone Builder Experience, and afterwards, Winetricks will set the version of Windows that Wine is "emulating" to Windows 7.
| Note If Winetricks gives you a warning about a 64-bit prefix, add WINEPREFIX=~/wine32 WINEARCH=win32 to the beginning of the command.
|
Once the installations are complete, Follow the Windows install instructions. It may try to reinstall some dependencies – if so, accept and install them. You should not need to change any of Zone Builder's installation settings. Once complete, you should be able to locate the Builder.exe executable (it is usually located in ~/.<name of your prefix>/drive_c/Program Files/Zone Builder/) and complete the last step in the install instructions and start Builder.exe with Wine.
| Note If you decide to put your WINEPREFIX in a subdirectory of your SRB2 folder, make sure you remove the dosdevices/z: symbolic link, which by default points to the root directory. This is because SRB2 recursively scans this directory as part of its loading process, and will get stuck in an infinite loop when it traverses this symbolic link.
|
Setup
First, you need to specify SRB2's IWAD and the executable that is used to run SRB2 when testing your maps. To specify the IWAD, go to Tools → Game Configurations in the menu bar. A window will pop up with a list of configurations. From this list select "Sonic Robo Blast 2 - 2.2", which should have a tick symbol in the box next to it as shown below:

If running Zone Builder using Wine, you may encounter errors from various SRB2-related configurations, reporting that spaces are not allowed in key names, and you will not be able to select it from the list of configurations. If this occurs, close Zone Builder, locate the erroneous configuration file, copy its contents into a fresh text file, and overwrite it. Relaunch Zone Builder and select "Sonic Robo Blast 2 - 2.2" as the configuration.
In the Resources tab, click on "Add resource..." and then on the folder symbol in the window that pops up to select the IWAD. Navigate to your SRB2 folder and select srb2.pk3 as seen below:

To set the testing executable, go to the Testing tab of the Game Configurations window. There, click on the folder symbol next to the Application box, navigate to your SRB2 folder and select srb2win.exe.
If you don't know how to make a shortcut on the desktop, then go into the directory you installed Zone Builder in, right-click Builder.exe and select Send to → Desktop (create shortcut).
Creating a map
To create a new map, select File → New Map in the menu bar or click the button with the blank sheet icon at the top left of the toolbar. A window like this will pop up:

Here you can select the configuration you want to use and the slot that the map will occupy. You can also import additional textures if you want to use them, but for the purpose of this tutorial, you should leave these fields as they are. Make sure "Sonic Robo Blast 2 - 2.2" is selected as the configuration and click OK.
Important map components

Before you can start editing the map you just created, you need to understand the basic structure of SRB2 maps. Maps are made up of five main components: vertices, linedefs, sidedefs, sectors and Things. Look at the triangle in the image to the right. This triangle is a sector. It is made up of vertices (the blue dots in the corners) which are connected by linedefs (the white lines between the blue dots).
- Vertices: A vertex is essentially a point in the map where a linedef ends/begins. Thus, vertices make up the corners of sectors. In our example triangle, they are the blue dots in the corners. Since vertices have no other properties aside from their location, you will rarely need to place them directly; instead you will automatically create them along with the linedefs that you draw. However, you will occasionally need to move vertices around in order to change the shape of an already existing sector.
- Linedefs: Linedefs are the lines that connect the vertices, and therefore the edges of a sector. In our example triangle, these are the white lines surrounding it. In the game, linedefs will form the walls of the level. As you can see in the example triangle, Zone Builder displays a small notch in the middle of each linedef. This notch indicates which direction the linedef is facing. It always extends to the right of the linedef, e.g. if the notch goes north, the linedef is facing west.
- Sidedefs: Each linedef consists of two sidedefs. They are literally the sides of the linedef. The side with the notch is the front sidedef. In the example, the front sidedefs all face inward. The sides without the notch are the back sidedefs, which face outward in this example. Some linedefs, such as the ones that make up the map's outer boundaries, only have a front sidedef; they are called one-sided linedefs. The player should never be able to look at these from behind, or errors will occur. Sidedefs are the map components that display textures, i.e. the graphics that will later be visible on the level's walls.
- Sectors: In our example, the sector is the triangle itself. A sector is formed simply by making a closed loop of linedefs. You can't directly place a sector on the map, instead you must form a closed loop of linedefs around where you want your sector to be. Sectors are the map components that display flats, i.e. the graphics that will later be visible on the level's floors and ceilings.
- Things: These are just what the name says: They are things that you place onto the map, such as a starting point for the player, rings, enemies, monitors, obstacles, scenery objects like flowers, and several others. They are independent from the rest of the map structure, so you can place them anywhere you need them.
Interface
Before we start drawing level geometry, we must first take a look at Zone Builder's basic interface. The following is a screenshot of the main window, showing the different parts of the interface:

- Working area: This is where you will create your map. It is overlaid with a grid on which you can draw level geometry. The crosshair indicates the center of the grid.
- Editing modes bar: This bar is where you choose the current editing mode. See below for a list of the most important editing.
- Menu bar: Here you can find menus that give you access to most of Zone Builder's features. To the right of the menus are buttons that give you access to important features for the current editing mode.
- Toolbar: The toolbar includes buttons for the most commonly used features that are independent of the current editing mode.
- Sidebar: This sidebar contains several pop-up panels, including a dialog for undoing/redoing previous actions, a panel where you can set standards drawing settings for the map, a help panel, the tag explorer, and, in some editing modes, panels with additional settings. Hover over one of the tabs to open the corresponding panel.
- Information panel: This panel displays information about the highlighted map component, in this case a linedef. If nothing is highlighted, it displays general information as well as important messages such as warnings or error messages.
- Status bar: The status bar displays status information such as performed actions and information about the current selection. It also displays information about the chosen configuration, the grid size, the zoom level, and the current mouse coordinates. You can click the buttons next to the grid size and the zoom level to open windows where you can change these settings.
Editing modes
This is an overview of the most important editing modes, many of which you will use throughout the tutorial. A few additional editing modes will be introduced later on.
- 1 – Vertices Mode: In this mode, you can place vertices. As explained above, you normally won't place them manually, since vertices are automatically created together with linedefs. However, you can move them around, and insert new vertices into linedefs to split them.
- 2 – Linedefs Mode: This mode is for creating and moving linedefs, as well as editing their properties, which includes the sidedefs. You will use this mode to draw new sectors.
- 3 – Sectors Mode: This mode is for moving sectors around and editing their properties. As explained above, you don't actually use this mode for creating new sectors; that is done by creating a closed loop of linedefs.
- 4 – Things Mode: This mode is for placing and moving Things, as well as editing their properties.
- 5 – Visual Mode: This mode lets you navigate through a 3D preview of your map, which is useful for seeing what your level will look like and finding map errors easily. You can find a more detailed introduction to Visual mode in Chapter 7 of this tutorial.
- 6 – Edit Selection Mode: This mode lets you edit selected map components, for example rotate or resize them. Edit Selection Mode is explained in detail in Chapter 4 of this tutorial.
- 7 – Find and Replace Mode: This mode lets you search for map components and, optionally, replace found elements.
- 8 – Map Analysis Mode: This mode lets you search for errors in your map, such as broken level geometry.
Basic controls
- To select or deselect an object, left-click on it. You don't have to hold Ctrl to select multiple objects; just click on new objects and the old ones will be kept in the selection.
- To quickly select multiple objects, left-click into empty space, hold the mouse button and drag the mouse to draw a box over everything you want to select. This will not deselect any other objects already selected.
- To deselect all selected objects, press C or click into empty space.
- To place a new object, right-click where you want to place it. To edit an existing object, right-click on it.
- When drawing sector geometry, left-click to place a new vertex. Right-click to finish drawing.
- Scroll the mouse wheel to zoom in or zoom out.
- For more controls, select Tools → Preferences in the menu bar and switch to the Controls tab.