SRB2 Doom Builder tutorial/Getting started
Before you start making your first map, you need to install and set up SRB2 Doom Builder and get familiar with its interface.
Installation and setup
Click here to get the installation file; then run the installation wizard. After installing SRB2 Doom Builder, you need to download the configuration file for SRB2 2.1. The file can be found here. Once you have downloaded the file, you need to put it in the folder where you installed SRB2 Doom Builder (typically in C:\Program Files\SRB2 Doom Builder). Unless you want to make or view maps for Version 1.09.4, you can delete the file srb2ex.cfg in that folder.
Now you need to specify the IWAD for SRB2 Doom Builder. Open BuilderSRB2.exe and select Tools → Configuration in the menu bar. From there, click on the Files tab. A list will appear that contains an entry called "Sonic Robo Blast 2 v2.1". Select that entry and click on the Browse... button. In the window that now appears, navigate to your SRB2 folder and select srb2.srb. Now, click on the Defaults tab and search for the "Floor Texture" panel. There, replace FLOOR0_6 with GFZFLR01.
If you don't know how to make a shortcut on the desktop, then go into the directory you installed SRB2 Doom Builder in, right-click BuilderSRB2.exe and select Send to → Desktop (create shortcut).
Creating a map
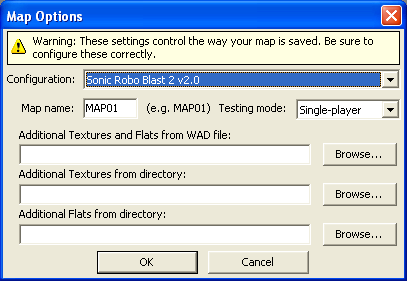
To create a new map, select File → New Map in the menu bar or click the button with the blank sheet at the top left of the toolbar. A window like this will pop up:

Here you can select the configuration you want to use, the slot that the map will occupy and the gametype you want to test it in (choose Single Player for this tutorial). You can also import additional textures if you want to use them, but for the purpose of this tutorial, you should leave these fields as they are. Make sure Sonic Robo Blast 2 v2.1 is selected as the configuration and click OK.
| Note The list of gametypes seen in SRB2 Doom Builder is outdated for Version 2.1 and onwards. Maps can still be tested with the Test Map button in the toolbar, but the gametype selected in SRB2 itself may not be the gametype you selected to test with in SRB2DB. |
Important map components

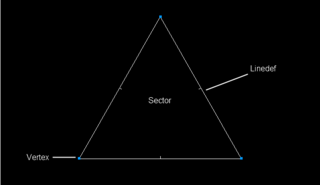
Before you can start editing the map you just created, you need to understand the basic structure of SRB2 maps. Maps are made up of five main components: vertices, linedefs, sidedefs, sectors and Things. Look at the triangle in the image to the right. This triangle is a sector. It is made up of vertices (the blue dots in the corners) which are connected by linedefs (the white lines between the blue dots).
- Vertices: A vertex is essentially a point in the map where a linedef ends/begins. Thus, vertices make up the corners of sectors. In our example triangle, they are the blue dots in the corners. Since vertices have no other properties aside from their location, you will rarely need to place them directly; instead you will automatically create them along with the linedefs that you draw. However, you will occasionally need to move vertices around in order to change the shape of an already existing sector.
- Linedefs: Linedefs are the lines that connect the vertices, and therefore the edges of a sector. In our example triangle, these are the white lines surrounding it. In the game, linedefs will form the walls of the level. As you can see in the example triangle, SRB2DB displays a small notch in the middle of each linedef. This notch indicates which direction the linedef is facing. It always extends to the right of the linedef, e.g. if the notch goes north, the linedef is facing west.
- Sidedefs: Each linedef consists of two sidedefs. They are literally the sides of the linedef. The side with the notch is the front sidedef. In the example, the front sidedefs all face inward. The sides without the notch are the back sidedefs, which face outward in this example. Some linedefs, such as the ones that make up the map's outer boundaries, only have a front sidedef; they are called one-sided linedefs. The player should never be able to look at these from behind, or errors will occur. Sidedefs are the map components that display textures, i.e. the graphics that will later be visible on the level's walls.
- Sectors: In our example, the sector is the triangle itself. A sector is formed simply by making a closed loop of linedefs. You can't directly place a sector on the map, instead you must form a closed loop of linedefs around where you want your sector to be. Sectors are the map components that display flats, i.e. the graphics that will later be visible on the level's floors and ceilings.
- Things: These are just what the name says: They are things that you place onto the map, such as a starting point for the player, rings, enemies, monitors, obstacles, scenery objects like flowers, and several others. They are independent from the rest of the map structure, so you can place them anywhere you need them.
Editing modes
If you look at the panel at the bottom of the editor window, you will see that it reads "Lines". That means you are in Lines Mode, which is the editing mode that allows you to place, edit and move linedefs. You can't edit vertices, sectors or Things in this mode; to do that, you have to switch into the corresponding editing mode. SRB2DB has the following editing modes:
- Move Mode – This mode is only for moving around in the map view. It doesn't allow you to edit the map.
- Vertices Mode – In this mode, you can place vertices. As explained above, you normally won't place them manually, since vertices are automatically created together with linedefs. However, you can move them around, and insert new vertices into linedefs to split them.
- Lines Mode – This mode is for creating and moving linedefs, as well as editing their properties, which includes the sidedefs. You will use this mode to draw new sectors.
- Sectors Mode – This mode is for moving sectors around and editing their properties. As explained above, you don't actually use this mode for creating new sectors; that is done by creating a closed loop of linedefs.
- Things Mode – This mode is for placing and moving Things, as well as editing their properties.
- 3D Mode – This mode lets you navigate through a 3D preview of your map, which is useful for seeing what your level will look like and finding map errors easily. You can find a more detailed introduction to 3D mode in Chapter 7 of this tutorial.
Toolbar
You can select the editing mode as well as other options in the toolbar at the top of the window. Many of these options aren't yet important right now, but if you wonder what any of them mean, you can come back to this section for an explanation. The following is a listing of all the buttons:

- New Map – Here you can create a new map.
- Open Map – This lets you select and open a WAD file from anywhere on your computer.
- Save Map – This lets you save your map. Do this regularly to prevent losing your progress.
- Move Mode – Switches into Move Mode.
- Vertices Mode – Switches into Vertices Mode.
- Lines Mode – Switches into Lines Mode.
- Sectors Mode – Switches into Sectors Mode.
- Things Mode – Switches into Things Mode.
- 3D Mode – Switches into 3D Mode.
- Build Nodes – This function builds the nodes of your level. This is needed for playing the level, but it isn't important to know what it does in detail. Nodes are also automatically generated when testing or saving the level.
- Test Map – This function lets you play through and test the level in SRB2. Quit SRB2 and you will return back to SRB2 Doom Builder.
- Undo – Reverts your last action.
- Redo – Redoes the last undone action.
- Flip Selection Horizontally – Flips the selected map components horizontally.
- Flip Selection Vertically – Flips the selected map components vertically.
- Rotate Selection – Rotates the selected map components by a specified angle.
- Resize Selection – Resizes the selected map components to a specified percentage of their original size.
- Grid Settings – This window lets you change the size of the grid that is displayed in the map view.
- Snap To Grid – This function forces Things and vertices to be placed on the grid. This option is enabled by default, and you should only disable it if it's necessary to place a map component outside the grid.
- Stitch Vertices – This function makes nearby vertices stitch to each other. Like Snap To Grid, this option should be enabled by default.
- Center View – Shifts the map view to the center of the grid.
- Insert Prefab From File – Inserts a prefab into the map. Go to Chapter 7 for an explanation.
- Insert Previous Prefab – Inserts the last selected prefab again.
- Flip Linedefs – Switches the front and back side of a linedef. – Only selectable in Lines Mode.
- Curve Linedefs – This splits a linedef into smaller linedefs that form a curve. The shape is adjustable. – Only selectable in Lines Mode.
- Split Linedefs – Adds another vertex in the middle of a linedef, splitting it into two separate linedefs. – Only selectable in Lines Mode.
- Join Sectors – Combines two sectors into one. What was formerly the second sector will now have the properties of the first sector. This is useful if two sectors have the same properties anyway, because it decreases the file size and makes it easier for SRB2 to render the map. – Only selectable in Sectors Mode.
- Merge Sectors – Just like Join Sectors, but it also deletes any linedefs that are directly between the two sectors. – Only selectable in Sectors Mode.
- Gradient Brightness – This requires several sectors to be selected. This makes the light levels of the selected sectors increase gradually in the order they were selected in, starting with the light level of the first selected sector and gradually increasing to the light level of the last selected sector. – Only selectable in Sectors Mode.
- Gradient Floors – The same as Gradient Brightness, only with floor heights. – Only selectable in Sectors Mode.
- Gradient Ceiling – The same as Gradient Brightness, only with ceiling heights. – Only selectable in Sectors Mode.
- Cascade Tags – The same as Gradient Brightness, only with sector/linedef tags. What tags are will be explained later on.
- FOF Wizard – This is broken, don't use it. – Only selectable in Sectors Mode.
- Things Filter – Filters the displayed Things according to category and flags. What flags are will be explained later on. – Only selectable in Things Mode.
Basic controls
- To select or deselect an object, left-click on it. You don't have to hold Ctrl to select multiple objects; just click on new objects and the old ones will be kept in the selection.
- To quickly select multiple objects, left-click into empty space, hold the mouse button and drag the mouse to draw a box over everything you want to select. This will not deselect any other objects already selected.
- To select all objects in the map, press Ctrl+A.
- To deselect all objects, press Ctrl+D or click into empty space.
- To place a new object, right-click where you want to place it. To edit an existing object, right-click on it.
- Scroll the mouse wheel to zoom in or zoom out.
- For more controls, select Tools → Configuration in the menu bar and switch to the Shortcut Keys tab.
