Slope tutorial

| To do Add information about UDMF-only slope methods. |
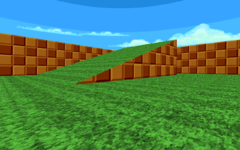
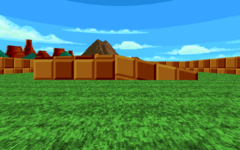
In SRB2, slopes are surfaces that aren't strictly horizontal but go upwards or downwards at an angle. They are supported since v2.1.15.
There are two ways to define slopes in SRB2: Sector-based slopes require two adjacent sectors with different floor or ceiling heights and are angled to make up the height difference between the two sectors. Vertex-based slopes are defined to go through three points that can be placed anywhere in the map. Sector-based slopes are faster to set up, but vertex-based slopes are more versatile and can be used to create geometry that isn't possible with sector-based slopes. Additionally, linedef specials exist that copy the slope of one sector to another.
This article will teach you how to create slopes in SRB2. While you can make maps with slopes in any map editor, Zone Builder is the only one that renders slopes in 3D mode and recognizes the linedef and Thing types used to make them.
Sector-based slopes
To create a sector-based slope, create two adjacent sectors that share a single linedef. Now you need to decide which of the two sectors you want to slope and whether you want to slope the floor or the ceiling (or both). In this example, we will slope the floor of the shared linedef's front sector. Give the shared linedef type 700. This will define a slope on the front sector that starts at the front sector's floor height and moves upwards or downwards to meet the back sector's floor height at the shared linedef. Experiment with the floor heights of both sectors until you get the slope you want.
The linedef type that you give to the shared linedef determines which sector and which surface is sloped. In our example, we chose linedef type 700, which slopes the front sector's floor. The following is a list of all available types:
| Linedef type | Sloped surfaces | Example WAD |
|---|---|---|
| 700 | Front sector floor | File:Ex ld700 slopefrontsidefloor.wad |
| 701 | Front sector ceiling | File:Ex ld701 slopefrontsideceiling.wad |
| 702 | Front sector floor and ceiling | File:Ex ld702 slopefrontsidefloorandceiling.wad |
| 703 | Front sector floor and back sector ceiling | File:Ex ld703 slopefrontsidefloorandbacksideceiling.wad |
| 710 | Back sector floor | File:Ex ld710 slopebacksidefloor.wad |
| 711 | Back sector ceiling | File:Ex ld711 slopebacksideceiling.wad |
| 712 | Back sector floor and ceiling | File:Ex ld712 slopebacksidefloorandceiling.wad |
| 713 | Back sector floor and front sector ceiling | File:Ex ld713 slopebacksidefloorandfrontsideceiling.wad |
By default, sector-based slopes are not dynamic. If you change the height of one of the two adjacent surfaces at runtime, for example via linedef type 400, it will stay in place and not move along with them. Slopes can be made dynamic by setting Flag [12] / No Netgame on the linedef with the slope special. This will make them automatically move along with their adjacent surfaces.
| |||||
Vertex slopes
To create a vertex-based slope, first create a sector that you want to slope. Again you need to decide whether you want to slope the floor or the ceiling of the sector. In this example, we will slope the floor. Select one of the sector's linedefs. If it faces inwards, give it linedef type 704, which slopes the front sector's floor. If it faces outwards, give it linedef type 714, which slopes the back sector's floor. If you want to slope the ceiling instead, use linedef types 705 or 715, respectively.
To define the slope of our sector, we will define a plane in 3D space. This can be done by supplying three points that the plane must go through. In SRB2, these three points are represented with so-called slope vertices, which are Things of Thing type 750. Place three such Things on the map at the points that you want the plane to go through. Give the linedef with the slope special an unused tag and set the Angle value of the slope vertices to that tag. The game will then calculate the plane defined by the three slope vertices and use it to define the slope of the sector. Note that the slope vertices don't necessarily have to be placed inside the sector that you want to slope; they can be placed anywhere in the map. Experiment with the positions and heights of the slope vertices until you get the slope you want.
By default, the Z position of the slope vertices is calculated relative to the floor height of the sector they are placed in. For example, if a slope vertex has a Z position of 32 and the sector has a floor height of 64, the absolute Z position of the slope vertex is 96. This is changed if the Parameter value of the slope vertex is set to anything besides 0. In this case, the absolute Z position is set directly via the flags value of the slope vertex, independent of the sector's floor height.
If you give the linedef with the slope special Flag [13] / Effect 6, the game will search for the associated slope vertices differently: Instead of searching for three slope vertices whose Angle matches the linedef's tag, it will search for one slope vertex that matches the tag, one that matches the X offset of the sidedef that faces the sloped sector (i.e., the front sidedef if the front sector is being sloped and the back sidedef if the back sector is being sloped) and one that matches the sidedef's Y offset. This makes it possible to share slope vertices between different slopes; it is also useful for making dynamic vertex-based slopes (see below).
The following table outlines the available linedef types for vertex-based slopes and the surfaces they slope:
| Linedef type | Sloped surfaces | Example WAD |
|---|---|---|
| 704 | Front sector floor | File:Ex ld704 slopefrontsidefloorbyvertices.wad |
| 705 | Front sector ceiling | File:Ex ld705 slopefrontsideceilingbyvertices.wad |
| 714 | Back sector floor | File:Ex ld714 slopebacksidefloorbyvertices.wad |
| 715 | Back sector ceiling | File:Ex ld715 slopebacksideceilingbyvertices.wad |
| ||||||||||||||||||||
Dynamic vertex slopes
By default, vertex-based slopes are not dynamic; they will stay in place even if their slope vertices are moved. You can make a vertex-based slope dynamic by giving the linedef with the slope special Flag [12] / No Netgame; the slope will then move along with its slope vertices. In order to dynamically change the height of the slope vertices, you need to use linedef type 799, Set Tagged Dynamic Slope Vertex to Front Sector Height.
For each slope vertex whose height you want to change dynamically, create a control sector, give one of linedefs linedef type 799 and set the linedef's tag to the Angle value of the slope vertex. Set the floor height of the control sector to the height that you want the slope vertex to have initially, before it is moved. The height of the slope vertex will now be controlled by the floor height of the control sector; the height of the slope vertex Thing itself will be ignored. This means that if the control sector's floor is moved at runtime, the slope vertex will move along with it, thus dynamically changing the slope. In order to change the control sector's floor height dynamically, you can use linedef executors like linedef type 403 or continuous floor movers like linedef type 54.
Note that linedef type 799 controls the height of all slope vertices whose Angle value matches the linedef's tag. The default setup of vertex-based slopes requires that all slope vertices belonging to a slope have the same Angle value. If you use linedef type 799 on such a slope, the slope will become flat since all slope vertices are set to the same height. Therefore, dynamic vertex-based slopes should use Flag [13] / Effect 6, which allows the slope vertices to have different Angle values.
| ||||||||
Example WAD
- Example file: Ex_ld799_settaggeddynamicslopevertextofrontsectorheight.wad (MAP01)
| How to use |
|---|
|
Copied slopes
Instead of defining a new slope for a sector, it's also possible to copy the slope of another sector to the current sector. To do this, give one of the linedefs of the current sector linedef type 720 (for copying the floor slope), 721 (for copying the ceiling slope) or 722 (for copying both). Make sure that the linedef faces inwards, since all three linedef types slope the front sector. Then, tag the linedef to the sector that contains the slope you want to copy. The plane that defines that sector's slope will be copied to create the slope of the current sector.
The following table outlines the available linedef types for copied slopes and the surfaces they slope:
| Linedef type | Sloped surfaces | Example WAD |
|---|---|---|
| 720 | Front sector floor | File:Ex ld720 copyfrontsidefloorslope.wad |
| 721 | Front sector ceiling | File:Ex ld721 copyfrontsideceilingslope.wad |
| 722 | Front sector floor and ceiling | File:Ex ld722 copyfrontsidefloorandceilingslope.wad |
Note that the properties of the tagged sector's slope will be passed on to the front sector's copy of the slope. For instance, if the original slope was dynamic, the front sector's copy of the slope will also be dynamic and will move whenever the original slope does. If the original slope had slope physics turned off, the copied slope will also have slope physics turned off.
| |||||
FOF slopes

Both sector-based slopes and vertex-based slopes can be used on FOFs:
- To use a vertex-based slope on an FOF, give the slope special to one of the control sector's linedef. Then, place the slope vertices inside the map and tag them like you would normally. Remember that, in order to properly slope both the floor and ceiling of the same FOF, you will need to have Flag [13] / Effect 6 checked on the slope linedef of either your floor or ceiling. (See above for how to use tag and offsets to define a vertex slope.)
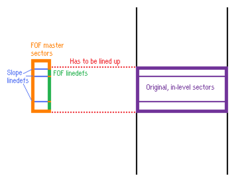
- To use a sector-based slope on an FOF, create a new sector adjacent to the FOF's control sector that shares one linedef with it. Then you can set up the slope like you would for a normal in-map sector by giving the shared linedef a slope special and setting the floor/ceiling heights of the two sectors. However, the problem with this method is that the position of the slope depends on the position of the control sector, which can make it difficult to line up the slope with the in-map FOFs. Therefore, vertex-based slopes may be more convenient for FOFs, since you place the slope vertices inside the map itself.
Example WAD
- Example file: ex_slopefof.wad (MAP01)
| How to use |
|---|
|
Texture skewing

If a texture is pegged to a sloped surface, it is possible to skew it towards that surface to match the angle of the slope. Depending on the type of texture, skewing is either enabled by default and can be disabled with a linedef flag, or is it disabled by default and can be enabled with a linedef flag:
Middle textures are automatically skewed. By default, middle textures are attached to the ceiling, so they will be skewed according to the ceiling's slope. You can attach a middle texture to the floor instead by setting Flag [4] / Lower Unpegged or Flag [8] / Peg Midtexture / Effect 3 on the linedef (but not both). If you want to disable the skewing effect, set Flag [7] / No Midtexture Skew / Effect 2.
Upper and lower textures are not skewed by default, but you can enable skewing by setting Flag [5] / Slope Skew / Effect 1 on the linedef. The lower texture is attached to the higher of the two adjacent floors by default, so it will be skewed according to the slope of the higher floor. If Flag [4] / Lower Unpegged is set, it will be skewed towards the lower floor instead. The upper texture will be skewed towards the lower of the two adjacent ceilings by default. If Flag [3] / Upper Unpegged is set, it will be skewed towards the higher ceiling instead.
The textures of FOFs are not skewed by default, but you can enable skewing by setting Flag [3] / Upper Unpegged on the FOF's control linedef. By default, the FOF's textures will be skewed towards the FOF's top surface. However, if Flag [4] / Lower Unpegged of an in-level linedef is set, any FOF textures on that linedef will be skewed towards the FOF's bottom surface. This behavior is changed if the FOF's control linedef has Flag [15] / Transfer Line set: In this case, the skewing is controlled by setting Lower Unpegged on the linedefs of the FOF's control sector instead of the in-level linedefs.
Example WADs
- Example file: ex_slopeskew.wad (MAP01)
| How to use |
|---|
|
- Example file: ex_fofslopeskew.wad (MAP01)
| How to use |
|---|
|
Physics
By default, slopes have special physics applied to them that modify the player's momentum. These can be turned off by setting Flag [11] / Netgame Only on the slope linedef; in this case the slope will behave like a staircase. This can be useful for small sector-based scenery details that would otherwise launch the player into the air when walking over them.
